Toggle sidebar
Components
Accordion
Autocomplete
Avatar
Badge
Brand
Button
Breadcrumbs
Calendar
Callout
Card
Carousel
Chart
Checkbox
Color picker
Command
Context
Composer
Date picker
Dropdown
Editor
Field
File upload
Heading
Icon
Input
Kanban
Modal
Navbar
OTP Input
Pagination
Pillbox
Popover
Profile
Progress
Radio
Select
Separator
Skeleton
Slider
Switch
Table
Tabs
Text
Textarea
Time picker
Timeline
Toast
Tooltip
New
New
Installation
Flux is a robust, hand-crafted, UI component library for your Livewire applications. It's built using Tailwind CSS and provides a set of components that are easy to use and customize.
Starting a new project? Flux comes baked into the new Livewire starter kit ->
Prerequisites
Flux requires the following before installing:
Getting started
1
Install Flux
Flux can be installed via composer from your project root:
Copy to clipboard
composer require livewire/flux2
Install Flux Pro (optional)
If you have purchased a Flux Pro license, you can install it using the following command:
Copy to clipboard
php artisan flux:activateDuring the activation process, you will be prompted to enter an email and license key.
If you haven't purchased a Flux Pro license, you can purchase one here ->.
The above command will create an auth.json file in your project's root directory. This file contains your email and license key for downloading and installing Flux and should not be added to version control.
Because auth.json is not version controlled, you will need to manually recreate it in every new project environment. See below for cloning an existing project or how to activate in CI or activate using Laravel Forge.
You can also view your licenses and their associated install instructions here ->
3
Include Flux assets
Now, add the @fluxAppearance and @fluxScripts Blade directives to your layout file:
Copy to clipboard
<head> ... @fluxAppearance</head><body> ... @livewireScripts @fluxScripts</body>4
Set up Tailwind CSS
The last step is to set up Tailwind CSS. Flux uses Tailwind CSS for its default styling.
Flux v2.0 requires Tailwind CSS v4.2 or later.
If you already have Tailwind installed in your project, just add the following configuration to your resources/css/app.css file:
Copy to clipboard
@import 'tailwindcss';@import '../../vendor/livewire/flux/dist/flux.css';@custom-variant dark (&:where(.dark, .dark *));If you don't have Tailwind installed, you can learn how to install it on the Tailwind website.
5
Use the Inter font family
Although completely optional, we recommend using the Inter font family for your application.
Add the following to the head tag in your layout file to ensure the font is loaded:
Copy to clipboard
<head> ... <link rel="preconnect" href="https://fonts.bunny.net"> <link href="https://fonts.bunny.net/css?family=inter:400,500,600&display=swap" rel="stylesheet" /></head>You can configure Tailwind to use this font family in your resources/css/app.css file:
Copy to clipboard
@import 'tailwindcss';@import '../../vendor/livewire/flux/dist/flux.css';...@theme { --font-sans: Inter, sans-serif;}Theming
We've meticulously designed Flux to look great out of the box, however, every project has its own identity. You can choose from our hand-picked color schemes or build your own theme by customizing CSS variables.
Disable dark mode
By default, Flux will handle the appearance of your application by adding a dark class to the html element depending on the user's system preference or selected appearance.
If you don't want Flux to handle this for you, you can remove the @fluxAppearance directive from your layout file.
Copy to clipboard
<head> ...-- @fluxAppearance</head>Now you can handle the appearance of your application manually.
Publishing components
To keep things simple, you can use the internal Flux components in your Blade files directly. However, if you'd like to customize a specific Flux component, you can publish its blade file(s) into your project using the following Artisan command:
Copy to clipboard
php artisan flux:publishYou will be prompted to search and select which components you want to publish. If you want to publish all components at once, you can use the --all flag.
Keeping Flux updated
To ensure you have the latest version of Flux, regularly update your composer dependencies:
Copy to clipboard
composer update livewire/flux livewire/flux-proIf you've published Flux components, make sure to check the changelog for any breaking changes before updating:
Cloning an existing project
If you're cloning an existing project that uses Flux Pro, you will need to authenticate your Flux Pro installation.
When running composer install, you will be prompted to provide a username and password:
- Enter your Flux account email as the username
- Enter your Flux license key as the password
To avoid manually typing these credentials, you can create a Composer auth.json file.
To do this, run the following command before you run composer install:
Copy to clipboard
composer config http-basic.composer.fluxui.dev your-email your-license-key
Make sure to replace `your-email` and `your-license-key` with your actual Flux account email and license key, which you can find on your dashboard ->.
This will create an auth.json file in your project's root directory. This file contains your email and license key for downloading and installing Flux Pro and should not be added to version control.
You can now run composer install and it should automatically authenticate the Flux Pro installation.
Activating using Laravel Forge
If you are using Laravel Forge, you can take advantage of their built in Composer credentials feature for
authenticating private composer packages.
Laravel Forge allows you to manage Composer credentials on a server or site level. If you have multiple sites using Flux, then it's recommended to manage Composer credentials
on the server level.
To authenticate Flux, head over to the Composer credentials section (Runtime > PHP on the server, or Settings > Composer on a site). You will then see the following:
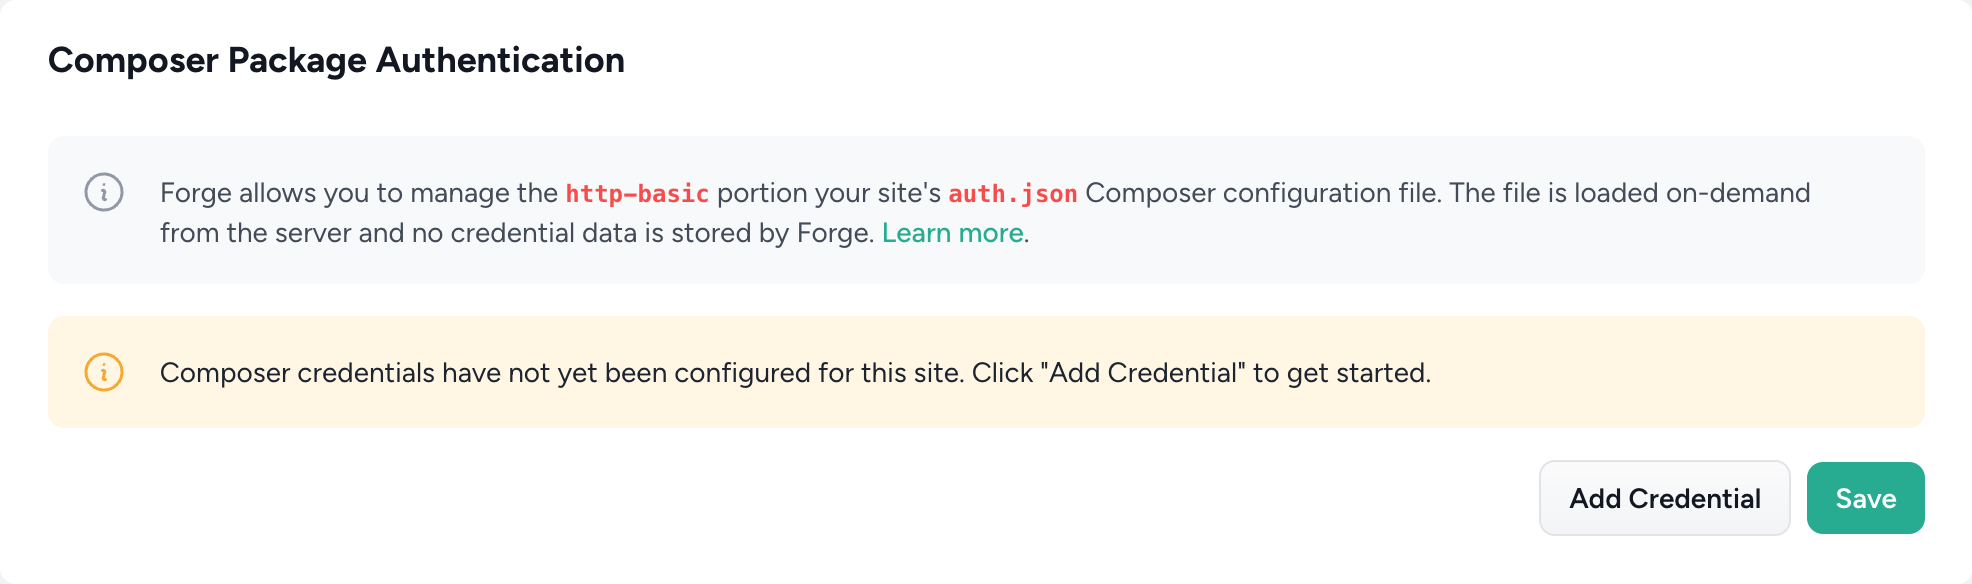
Click the "Add Credential" button to authenticate with a new private composer package and enter the following details:
- Enter composer.fluxui.dev as the Repository URL
- Enter your Flux account email as the username
- Enter your Flux license key as the password
Finally, click the "Save" button. You should now be authenticated with the Flux private composer server and be able
install Flux using composer require livewire/flux-pro
For more information, please refer to the Laravel Forge Packages documentation.
Activating using Laravel Cloud
If you are using Laravel Cloud, you will need to use their Build Commands feature for authenticating private composer packages.
To authenticate Flux, open up the environment you wish to use Flux in and go to "Settings" and then "Deployments".
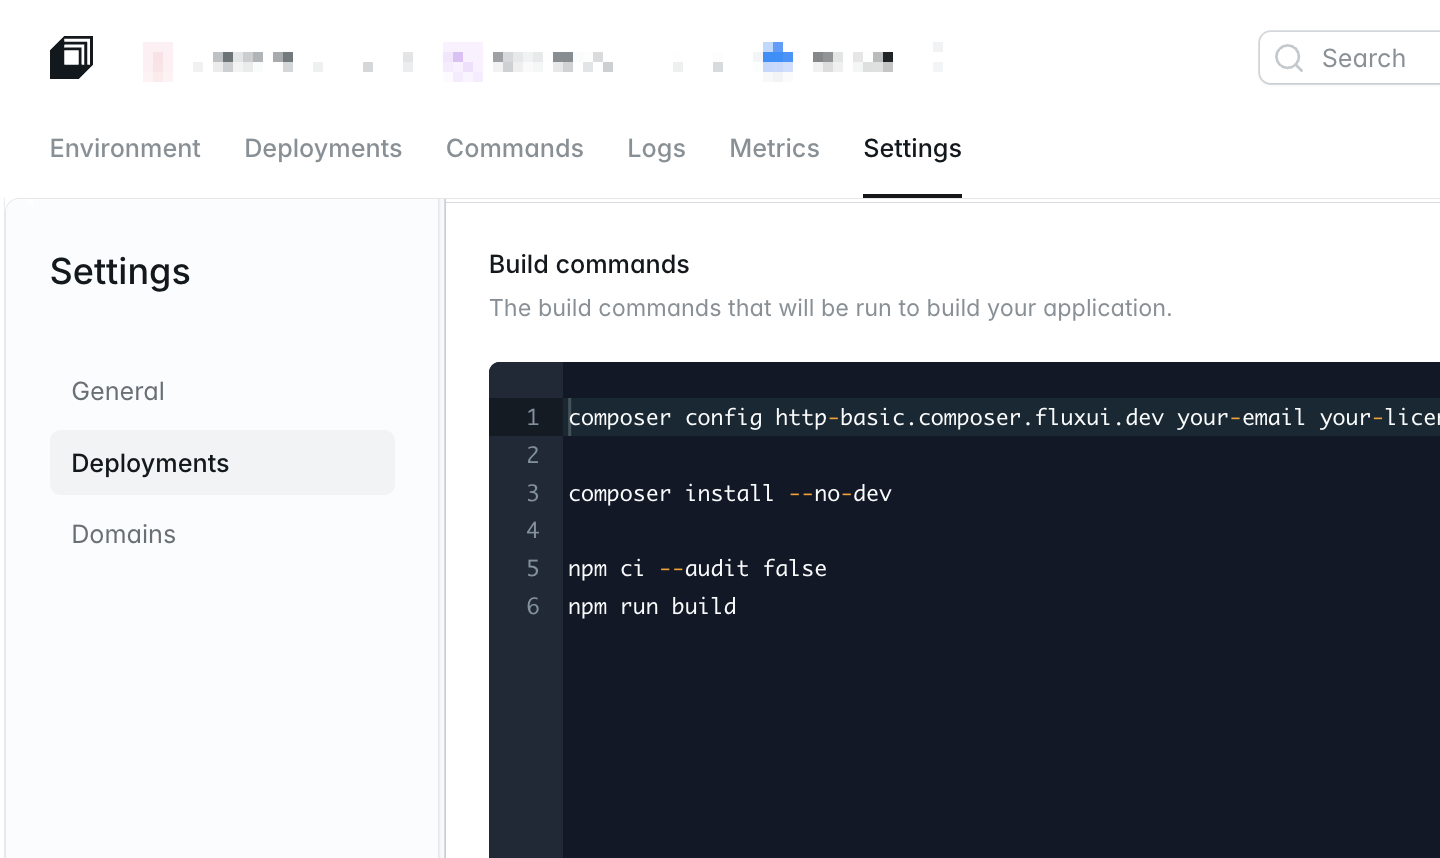
There you will find a "Build Commands" section. Add the following command above the existing composer install command:
Copy to clipboard
composer config http-basic.composer.fluxui.dev your-email your-license-key
Make sure to replace `your-email` and `your-license-key` with your actual Flux account email and license key, which you can find on your dashboard ->.
Finally, click the "Save" button. You should now be authenticated with the Flux private composer server and be able deploy your application.
For more information, please refer to the Laravel Cloud Private Composer Packages documentation.
Activating in GitHub Actions
If you are using Flux in GitHub Actions, you will need to add Flux's license details to your repository's secrets and then configure your GitHub Actions workflows accordingly.
To add your Flux license details as secrets in your GitHub repository, first browse to your repository on GitHub and then go to Settings > Secrets and variables > Actions.
From here, click on "New repository secret":

You will need to add the following secrets:
- FLUX_USERNAME – Your Flux account email
- FLUX_LICENSE_KEY – Your Flux license key
Once you've added these secrets, if you're using Laravel's Livewire Starter Kit, everything else should already be configured for you.
If you are not using the Livewire Starter Kit, you will need to add the following configuration to your GitHub Actions workflows:
Copy to clipboard
- name: Add Flux license run: composer config http-basic.composer.fluxui.dev "${{ secrets.FLUX_USERNAME }}" "${{ secrets.FLUX_LICENSE_KEY }}"This should be placed before the step that runs composer install.
To see this in action, check out the GitHub Actions workflow included with the Livewire starter kit ->.
You can now run your GitHub Actions workflow again and it should successfully authenticate the Flux Pro installation.
Activating in CI
If you are using Flux in a CI environment without an auth.json file, you can add the following environment variables and command to your CI script:
Copy to clipboard
composer config http-basic.composer.fluxui.dev "${FLUX_USERNAME}" "${FLUX_LICENSE_KEY}"Configuring nginx
If you run into problems loading Flux's JavaScript and CSS assets, you may need to configure your nginx server to allow for this.
By default, Flux exposes a few routes in your application to serve its assets from, such as /flux/flux.js, /flux/flux.css, and /flux/editor.js.
This is fine for most applications, however, if you are using nginx with a custom configuration, you may receive a 404 from these endpoints.
To fix this issue, you can add the following to your nginx configuration:
Copy to clipboard
location ~* ^/flux/(flux|editor)(\.min)?\.(js|css)$ { expires off; try_files $uri $uri/ /index.php?$query_string;}
This block should be placed before any other location blocks that match `.js` or `.css` files.
Copyright © 2026 Wireable LLC ·Terms of Service